When installing framing screws on metal studs, you need to select the right size. You should choose the correct bit for the job, as the wrong one may not fit the stud properly. In addition, you should also choose the proper drill bit for the task, as drywall screws are not suitable for securing metal struts.
A specialized nuts screw with carbide, titanium, or cobalt tips will provide the best results. Moreover, proper bits can be used again, which is ideal for home improvement projects. A good screw should have a fine thread that can handle 50 pounds of weight.
A Phillips head screw is recommended for heavier objects, such as mirrors, which weigh more than 50 pounds. You can buy large screw packs for your home and work shed.
The 3 Screws We’re Recommending for Everyone
It is best to have a large supply of screws, as you will probably need them for multiple projects. Large screws for metal studs are also convenient for storing them, as you will use them again. For bigger items, you should go for the ones with the higher weight capacity. You can buy a specialized screw pack, or just buy the same screw for a wide variety of projects.
Choosing the right size is essential for a quality result. When choosing a hex driver, remember to check the torque of the screw. If the nut is tight, you may need to change it. In the meantime, you can buy a small one instead.
A good screw for a metal stud is the Strong-Point TRUST-ZIN 875-100. These screws are designed for use on metal studs. They are inexpensive and come in a convenient pack of 100 pieces. This is the correct tool for an extensive range of jobs. The screw should be used with caution, as improper installation could weaken the joint.
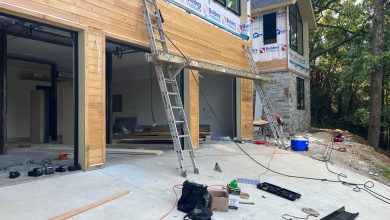
Let’s examine the following steps that show us how to construct an 8×10 wooden building
Floor level:
Clean the site of the shed prior to taking any other action. It is a crucial aspect of building. You can accomplish this by hiring an excavator to take care to clean the ground by yourself.
Build the frame:
In order to build the shed’s frame, set your frame over a few 4×4 skids. Allow 8 inches between the edges of those wooden skids. Before placing three” screws into the wood, holes must be drilled into the joists of 2×6. This stops the wood from breaking.
Frames for corners:
The second step to follow is creating the corners of frames. Make sure they are square by examining the length of the diagonal strings. After you’ve finished you can attach a 3/4-inch piece of wood to the shed’s frame. Fix the frame to joists with two nails. It is possible to use tongs and grooves on plywood because it holds the sheets together until they’re cut to the appropriate dimensions.
Front Walls:
This can be a little complicated and long-winded. It is important to leave a space to allow for the door. The top plate should extend at least 3 1/4″ from both sides. To provide additional support for the frame, you can put a double-header in the door’s opening at the top.
The Back Wall:
This will be one of the easiest walls to construct using fundamental techniques. Before you attach the three” nails, you need to drill holes through the plates. Verify that all corners are equal.
Side Walls:
The wall sides are able to be elevated by simply attaching the studs to the 2×4 plates. Utilize galvanized nails and screw them into. An excellent tip is using plywood to fill in gaps between the studs.
The top on the ground:
Now when the building’s walls have been built and laid out, place them on top of your floor. The edges of the outside are squared off on the floor prior to drilling into the floor and placing the screws. Join the joists by using three screws. A temporary 2×4 brace could be added to boost the strength of the frame.
Moreover, metal studs are tougher than wooden joists. You should choose metal studs made of steel to prevent moisture from ruining your new floor. It’s also important to choose the right screw. For this purpose, you should buy stainless steel studs. A hexagonal joist is a type of stud that is hollow.
What Screws Do the Experts Recommend? Here You Go!
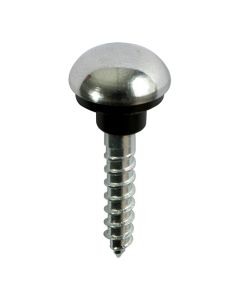
There are different types of screws for mirror screws with caps. The most common type of screw for this material is a #7 self-tapping screw, which comes in two sizes. It is a popular type of self-tapping screw, but it will not work on steel studs. It requires a special trip. If you’re not sure what to use, you can try a combination of different screws and drill bits.
A self-drilling hexagon studs screw is an excellent choice for mounting heavy objects on metal pillars. It is an excellent choice for attaching metal studs. It is suitable for all types of sheet materials. In general, these screws are made of 410 stainless steel. They are strong and resistant to corrosion and are therefore appropriate for use indoors and outdoors.
The hexagon studs can support a weight of up to 20 kilograms. The Hilitchi HSSD10 screws are self-drilling screw that is perfect for use with metal studs. This screw is designed for use with metal laths and is suitable for applications that require low-profile and wide-head screws. The
Self-drilling hexagon studs are especially popular with drywall because of their low-profile heads and self-tapping tip. The self-drilling hexagon studs are typically made of steel or aluminum.
They are a better choice than the wood hexagon-shaped ones because they are stronger and can handle more weight. Despite the fact that they are more expensive, they are often a better option for many applications.
The Secrets To Finding World Class Installing Mirror Screws With Caps Quickly
If you’re looking to fix a mirror on your wall, you’ll want to use mirror screws with caps. These screw covers provide a decorative finish and will keep your mirror from slipping out of place. You can use these to fix splashbacks, panels, or glass. You’ll need the right size mirror screw.
The screw cap is designed to prevent your mirror from slipping off the screw, but it’s still useful for securing thin panels. If you don’t want to use a cap, you can also use a wood plug. You can then secure the wood plug with wood glue. Just remember to clean the wood plug thoroughly before staining it.
If you don’t want to use a cap, you can also use sheradised nails with a counterbore to fit the wood surface. A countersink tool is an indispensable tool to use when you’re installing mirror screws.
Tried By The Best – Making Construction Techniques More Effective And Easy
The tapered bottom portion cuts a hole with a smaller diameter than the screw’s threads. It’s also great for covering up screw heads on mirrors or cabinets.
These types of screws can be hard to use on furniture, so be sure to practice on scrap wood before you start work. To install mirror screws with caps, you need to use drywall anchors. These anchors require a pilot hole.
Then, you need to drill a flange for the hex set screws shank to fit into. These are available in both conical and solid plastic forms. The first type is simple, requiring only a pilot hole. The second type is stronger, but it still requires a pilot hole. In the case of plastic anchors, you should also use a flanged anchor with the lowest weight limit.